


How to pack a sea shipping container with household contents
The former option demands less efforts, but induces a big money loss, as second hand personal effects drop a lot in value for anyone else than you. The latter option takes a lot of energy if you do it yourself, but allows to preserve the entirety of your household, except some consumables. If you own enough, this option is still the cheapest. Also, priceless is the feeling or living in a known setting again. If this is what you’re after.
I’ve tried both, and today I’ll share with you my own experience with packing a 20’ shipping container with my personal effects for a half-the-world-away trip. As always, there are the when, where, what and how considerations to take before you start anything.

The How and the What
The decision making process
It may not be worth packing a full container load if you don’t own much. Shipping a container is costly. Not only the hiring and insurance costs, but also time off work may add to the bill if you don’t have any, or not enough paid leave.
Practical case
You live in a studio apartment and own for about €6,500 worth of furniture, white goods and clothes and clothes, for a total volume of about 12 m3. You’re considering relocating back from Europe to Australia; if what you own is less than 20 cubic meters, you may consider option A: container sharing, since option B: full container load (FCL), could cost you not less than €4,000 in shipping and insurance (actual values, taken from an actual quote, 2016, from France to Australia).
I don’t know how much container sharing is these days, but it’s a cost that is proportional to the volume occupied by your stuff. The base unit is the m3. A number of years ago, I paid about $300 per m3. It might have gone up.
If you are considering option C: selling everything and buying it back in Europe, you might get €1,500 back from selling your effects, if you’re lucky, but pay about €8,000 to buy everything back in Australia, where prices are generally highers than those in Europe.
The total cost of these three options is:
- option A: €2,500 + pickup/delivery cost to and from the harbour
- option B: €4,130 (includes pickup, delivery, road delivery at destination and marine insurance)
- option C: €6,500
Now, in a different scenario where you’re a bit older, with more stuff at home, let’s suppose your household contents total up €40,000 for a volume of 30 m3.
Option A: container pooling, is now ruled out, since you have just as much stuff as the volume of the container itself (33 m3), considering that in practice, you can’t really reach perfect 100% compactness
Selling, option B, could bring you €10,000 , since Europeans, more than anywhere else, will only buy your stuff back for about 25% of its value, at best. Plus, it will require a lot of time and efforts to organise the sales, given the number of items. Buying everything back in Australia may cost you €50,000, especially if, like I do, you own quite a bit of sport equipment, cheap in Europe, a small fortune in Australia.
Here, option C: FCL, would cost you about €4,800. The price difference between this scenario C, and the previous - smaller apartment - scenario C, comes from the fact that you have insured your content for a higher value. The insurance component is about 2% of the declared buy back value in the destination country.
The total cost of these three options is:
- option A: n/a
- option B: €40,000
- option C: €4,800
In my opinion, you should take into account the time taken to organise the sale or the packing, and also the cost of hiring a vehicle, or someone to pick up your load and take it for container sharing if you choose option A.
Enquiring about shipping in a container
You’ll realise there are a few transport companies who do this in your area, at very different prices.
My belief is that for this type of job, you can’t say you benefit from a lot of post-sale value added. It’s basically raw service all across the board: drop-off, pickup, transport, customs clearing, transport, delivery. Therefore you should choose the cheapest.
The When
Iso-hemisphere relocation
If the shipping route stays all in one hemisphere, I advise yo to rather pack and ship in the nice season. Especially if your place can get really humid at packing time. You would store gaseous water in these extended days when packing, and it may condensate every night inside the container even though you haven’t finished yet. Imagine your quilts, sheets, clothes, couch, covered in dew every night . . .
If you can’t choose the date yourself, pack at home before taking out to the container. Take your items out into the container during the warmer hours of the day, and close the container doors tightly before night time to avoid inside condensation. This is particularly true up in Queensland, when dew starts to form about an hour before sunset in autumn and winter.
Use an excess of plastic bin bags to wrap your items made of fabric; tightly pack your couch in large plastic sheets, like it is when a furniture shop receives it.
Trans-hemisphere relocation
If you relocate into another hemisphere, it’s a different story. I think it’s preferable to pack in a dry week in autumn or the start of winter, if there are any, so that your container arrives in the other hemisphere in the warm season. There’s physics behind this. I’ll try to explain my theory.
To pass from one hemisphere to another, the ship will cross the inter-tropical belt, traditionalist humid. The atmosphere inside of it might then get humid, but it’s acceptable as it’s still warm. Then, as the ship sails further along north, the outer atmosphere will either dry up if it’s heading to the warm season, or cool down if it’s heading to winter season. In the former case, it’s a win, as any humidity collected inside the container through the equator will escape the container as outside is drier and warmer (remember that the tropics are warmer and drier than the equator in summer, except if the ship’s destination is India or Asia, at monsoon time). Therefore your stuff should arrive dry. On the other hand, if the ship is heading towards winter after crossing a humid equator, the humidity collected inside the container may never leave it and even condensate as the temperature inside the container is dropping. Your stuff may then arrive wet. Then again this is just a theoretical case that is likely to happen, but some specific climatic conditions may hinder these predictions.
Packing in the rain
This situation is not welcome at all, especially if you have to walk some distance between your place and the container. It might pay to have your container delivered 10 days prior to departure, so that you wait and jump on the dry days of that period that may occur. This is the method I used for my personal relocation, as it was autumn and rainy. It turned out that waiting 3 days with the container tightly closed, not doing anything but packing inside the house, was the best option as the weather became clear, sunnier, colder and drier a few days later.
Although the logistic companies will more likely mind less about delivering your container early than leaving it too long for you to unpack, you may have to pay a levy to allow it to be idling empty more than a couple of days at your place.
The How
Preparing your house contents for shipping
You can do it yourself by buying a few female power-boards in your country of origin; then you’ll buy a few male plugs in the country of destination. Putting them together only needs a screwdriver, a cutting tool to strip the plastic off the wire ends, and about 15’ of work per power-board.
Will you’re destination place be big enough to accommodate everything? Will your washing machine be able to be plugged with the same input diameters for water supply, or just with cold water as some countries only have a cold water input.
Getting the container delivered
Up or down?


Some transport companies will have the proper truck on delivery day to be able to drop the container down to ground zero, some will not, so they will leave it on a trailer, up high, at about 1.5 m high. The former solution is preferable, and the latter obviously raises an issue. How are you supposed to lift the heaviest items up there?
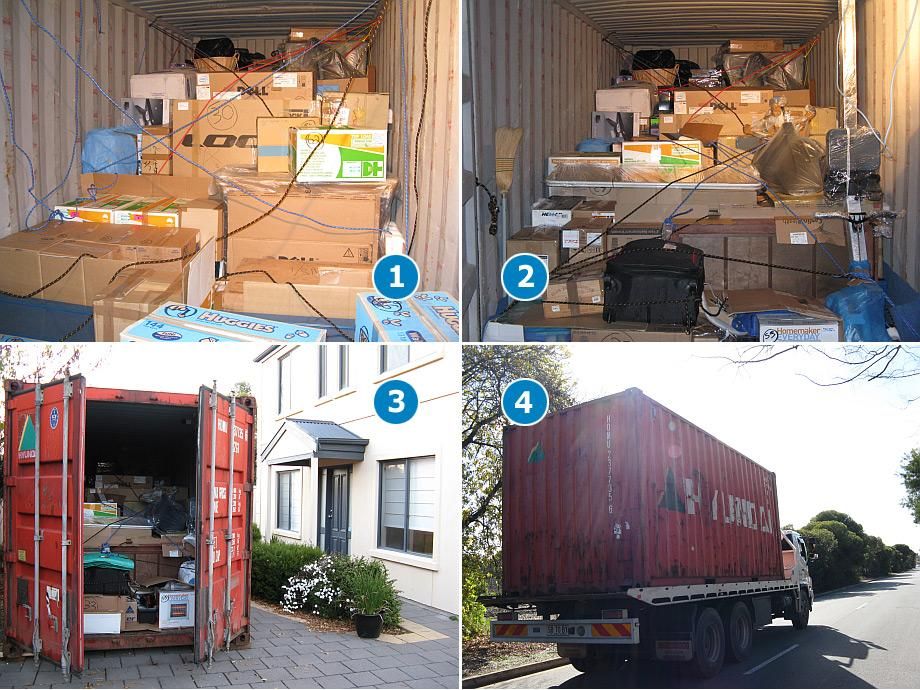
You will find useful to use a truck lift (or standalone lift), on the first day at least, to help you reduce the lifting height onto the container floor. I personally had both cases in my experience, and you just don’t want to go without a lift if the container is up high. You may just rent a truck for the first day only, when you load all the heavy items, as the rest can be put in the container just using muscle strength. Positionned at 90° with the entrance of the container, as shown on the picture on the left, the truck will help as a buffer zone, where your friends can fill the back of the truck with bug items as they commute between your house and the container, while you are preparing your working area inside the container (see Chapter“Preparing your helpers workspace” below).
Also, for your security, depending on where you live, you might want to use the truck to block the doors of the container overnight, hence not having to hire a security guard on the first night. This is what I did during one of my moves.
Approach transport companies a couple of months before your sought relocation date, to allow them to secure a space for a container on-board a vessel, and to secure the container itself, as well as the right type of truck to deliver it to your place.
If your place has a narrow access, they may need a tilt-tray truck. They can be rare to find in some cities.
If they have no access to your front door for such a big can, they might envisage delivering the container on the street (contact your local Council for prior approval; the permit could be refused and make your move a nightmare).
Wherever it is in the end, make sure, working closely with the driver, that the drop-off place is one that does not bother the traffic or the neighbourhood.
Your neighbour may be helpful if they enjoy a better street access than you do. They could maybe host the container for a few days on their front yard, or driveway. Consider the distance to carry heavy objects from your place to the container before choosing an option or another.
If what you need is street delivery, you’ll find out that your local council may need a public liability of a no-BS sum of $10m. Do you have the proper insurance policy for that as part of your house insurance. IF you don’t have a house insurance, it might be a problem, and maybe your favourite neighbour can use theirs to ask the permit in their name.
Allow yourself enough time with the container at your door or in the neighbourhood. You’ll find out that 3 days is the least you’ll need to pack it seriously and compactly. It may be free to have it a week ahead or more, so use this time wisely if you can.
When the logistic company says it is now ready to bring you the container, think of the positioning of the doors: will they open wide enough to allow you to move around with heavy or bulky objects?
If a tilt-tray truck is to be used, the maximum tilt angle, seen on picture 1 of this article, announces that the whole contents may fly inside the container, and remain unstable and shaky for the rest of the trip as early as pick up time. Therefore it’s a good idea to think ahead and consider an opening-forward delivery, where the doors of the container are facing forward when the truck holds the container on its tray. This way the heavier items, typically put at the back of the container first, will prop against the back wall at pick up and delivery at the harbour. It’s always a better option than propping against the smaller boxes of the container.
Light and temperature inside the container
With the deadline approaching (pick up time is set, and dictated by the vessel’s closing time), you might get caught up working undue hours inside the container. I myself put three days at about 16 hours of work a day to meet the deadline. I was mainly working in the afternoon and all night. Therefore your working conditions inside the container are essential. Make sure you’ve got a good halogen lamp that you can easily hook inside the container, for example using these nifty little hooks that IKEA has.
If there are no power outlets anywhere near the container, and or they are too far for you to use an extension cord, you may use a good headlamp, like a bicycle or running headlamp, fixed onto your head or even wear a bicycle helmet to fix the lamp using a bracket. I have already used this method, and it works really well.
Allow yourself a good rest after each day of work as the next might be just as hard or more. Drink plenty of water if you pack in summertime as the temperature and humidity conditions inside the container might turn your work into a real physical challenge.
It can be anecdotal to mention it, but if you leave in snake infested areas, you might want to tightly close the doors after you’ve worked, as the tin will get quiet, and could look like a reliable shelter for our legless friends.
Getting started and getting your first section up.

The first thing to do is to open it to air it. Who knows what it was used for just before becoming yours for a few weeks. It might stink, or be humid, and that smell or humidity will contaminate all your effects.
Then proceed with sweeping the inside thoroughly. A clean interior is quick to get and will save you time in cleaning every single item after unpacking.
If you can, get the floor covered in cheap yet clean carpet, or large pieces of cardboard. You can find cheap cut-outs that won’t sell, or collect some at some unlikely places, like after an expo, or a sport competition. I got mine from after the Australian Swimming Championship 2012! They had dunked entire rolls of thin clean carpet. When you think they hold some prestigious Olympic champion DNA as we speak . . .
Spot where the anchor points are inside the container. There are plenty, up and down.
Think of how much rope you’ll need. I personally got 120 m of rope at just over 20 cents per meter. I’ll explain later in this article how to use it.
Prepare your helpers workspace at the doors

As easy as it is to quickly get overwhelmed by acessories, try to keep them separate, like on shop shelves, to quickly spot what you need, and please keep them this way over the days. Always return to the helper area unused items, so they don’t stay in your way, or get altered in some way.
Sort the cardboard you will have collected in the previous days / weeks into two catagories: noble and cheap. Cheap will be used to cover the floor, or fold to make corners or shock absorbers, and noble will be used to separate items using this smooth and clean cardboard as protective sheets. I personally got some cardboard off a publicly accessible recycling bin of a well-known logistic company.
You must ensure the white goods are dry and their doors are left slightly open (insert a thick piece of cardboard, foam, or use any other valid trick to ensure they are not completely closed, otherwise you will get blue cheese upon arrival!).
Use mover’s blankets to protect the top, the sides, and the top corners of all the big items and whitegoods. You don’t really need to secure the blankets with elastic bands or ropes, if you chose blankets that are big enough. Think of it at order time, you’ll save time this way.
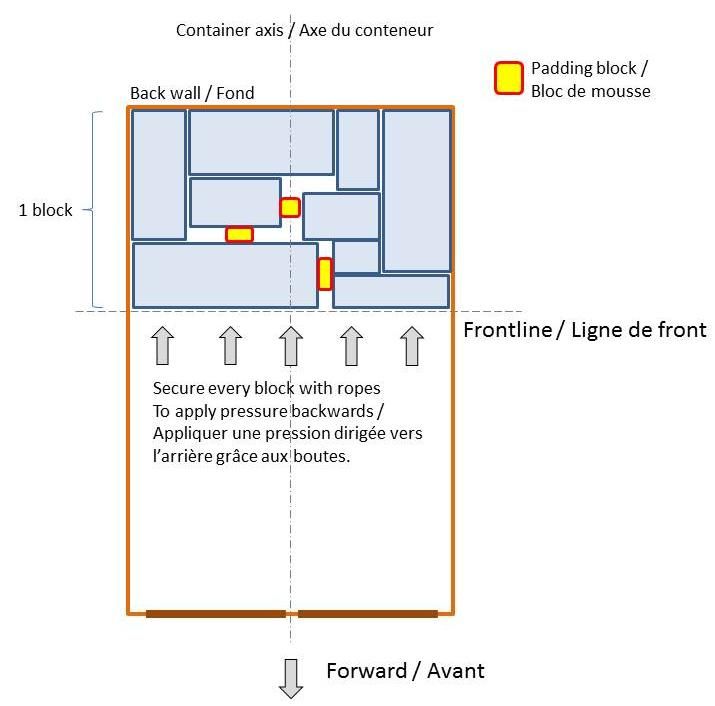
I was mentioning Tetris earlier; well, like at Tetris, once you get a full row, i.e. a front line, the whole block shifts up. It is a similar game here inside the container: once you get a front line, i.e. a line perpendicular to the axis of the container (click image thumbnail to enlarge), it is a good time to secure that block tightly with a rope, or ropes. Anchor your rope further back, and make it restrain that block before going to the back of the container again. This way it will prevent the block from moving forward. You already know it won’t move back since because of the container back wall, neither will it move on the sides thanks to the container side walls. As a result, that block shouldn’t move at all.
It’s not always possible to attain 100% compactness. Therefore you should use padding blocks. In the weeks prior to moving, I got all shapes and sizes from Harvey Norman bins. Make sure you pick dry days to pick them from the bin . . .
Box time, random shaped items, and finalising
some boxes can fit in some corners, gaps, or pigeon holes if you have shelves for example. In that case they would act as the yellow padding blocks seen on the arrangement diagram. But only a minority will go there anyway, the major part will come in the last sections.
By definition, once all the heavier items are at the back, there only remain the lighter ones, unless you’re household has only heavy items . . . Seriously, as you go you will form a kind of massive wedge that ends at the container doors. See picture (2) on the mosaic on the left. Follow the Tetris block arrangement and securing until you pack your entire contents.
Do not stack boxes as much possible. It is not a good idea as they can easily slip off and fall, breaking their own contents or other contents. Bear in mind the ship will literally rock and roll for days or weeks, sometimes for over a month (like in my case).
In you really have to stack boxes, place the heavier as low as possible, to avoid rolling (on the ground if possible). If you have a large number of same size boxes, you should build a consistent low block, like a slab on the floor, with them. If they contain incompressible stuff, like books, they can themselves bear a lot of weight, meaning you will be able to put random shapes over them at the very end.
If you have too many too small boxes, gather them in a larger strong box. (I’m thinking of small office items, stationery, etc . . . ). This way you’ll contribute to the compactness by using large square volumes, that can endure pressure from all sides.
At all times you must think: "can this item move sideways, and back and forth, while the ship will be rocking and rolling?".
Compactness is the keyword.
Welcome to the third dimension
Another important rule is:- "have I used the third dimension of the space (i.e. the height) as much as I could ?"
Remember, a container is only worth its actual volume if you use the third dimension of the space. If you use the first metre up only, you’ll be only looking at 13m2 or so, vs 33m2 if you use the whole height.
But with the wedge arrangement I was talking about, what you really use if more like 172 anyway, as you can’t really stack smaller boxes up to the top.
If there are small business around your place, go and ask them if it’s possible, for a couple of bucks, that they wrap some of your most square little boxes on pallets. This way you can go up in height and take advantage of the third dimension.
Last, random shape objects
Everybody has got some in their household. I am thinking of prams, hoists, garden tools, sport equipment, all those things that hardly fit in a box, or, if they do, are a waste of compactness (that damned keyword . . . ).
My belief is to stack them up, in the antiwedge, i.e. the empty space above the solid wedge.
The advantage is that that empty wedge could be as much as 10m3 or more.
These items are sometimes heavy. In my case I had a Concept2 ergometer to pack, it’s both quite heavy, and very odd shaped. I unfortunately couldn’t keep the boxes at the time, so I had to pack it either in a corner, or on top of everything. I had just enough room to pack it in the corner just behind the front door, but I could have stacked it on top of everything too, with appropriate securing.
Once the bottom wedge is all compact and secure, it is not an problem to stack bulky items on that, provided they don’t press too much at one spot in particular. Of course I don’t want to see a washing machine or a dishwasher on there, since it’s heavy and square such items should go to the back, but bikes, pram, hoists, rakes, brooms, all these things could go at the top, with appropriate wrapping and securing.
Avoid pressure points by lying them on a long flat side if they have one. Weight is not a problem if it’s evenly distributed along a large surface. Weight divided by surface is a physical quantity that defines pressure. The higher the contact surface the lower the pressure. The lower the pressure the less damage. No punching or puncture in short.
Listing, insuring and tracking your contents
At this stage the job is done. In my case I spent about 35 hours of work in 2.5 days to pack the container. At some point I had to reorganise items to optimise the arrangement. My biggest time spending was done to prepare the items at home before dragging them into the container, not to arrange the container itself.
The container content list
As you were packing, you have numbered, labelled, and maintained a n electronic spreadsheet of all the boxes and“loose” items inside the container. Electronic management will save you time, as you will send this list to the carrier, to the insurer, and keep the source for you to show the customs at arrival too. You will need at list 3 columns: box number, description and replacement price at destination.
This latter value is important to describe for each and every line, as your spreadsheet software will be useful to sum up the whole amount.
This whole amount can be used by the insurer in case a drama occurs, but before that it will simply be used to evaluate the veracity of your home contents value declaration when you choose your cover level.
The destination Customs will also use this value to let your container to go through without (or with . . . ) any levy. Depending on the destination, you should check with the Customs if you have to produce a relocation declaration to prove this is your home contents, so that you are not charged import tax on your own stuff!
For example, Australia may ask to see your visa to assess if your relocation is genuine. France may ask for a relocation declaration that the French consulate will send you once you return your consular registration card and give them a destination address; they may need a utility bill and a letter from the person who will host you at destination, or your destination lease, or any document proving your move is a genuine relocation.
Insuring your contents
The carrier is about to send their truck to come and pick your canned life. You can wait as late as this moment to organise insurance, but it will be less of a worry if you already had had this done.
In Australia, like most things, a few minutes only over the phone were all it took to get the contents insured. You will need to tell them the container number that appears on the metal plate on a door of the container; also email your contents list, and agree verbally, or by a written declaration, that you are ok with the Terms and Conditions of the insurance policy. Be prepared that any damage done to your items by themselves, as in, following rocking, rolling, mis-packing, loose securing, etc, will be at your own expense, and can’t be claimed against. The carrier’s responsibility is only engaged if they make a mistake, or a natural even provokes a loss (storm leading to your container rolling overboard).
Expect to pay a 2% premium or so of the total sum insured for that one way trip. It’s both a lot if nothing happens, and a negligible sum if your container gets sea sick and disappears overboard . . .
Tracking your contents
Very soon should the carrier send you a bill of lading, a marine word for“voyage document” for your container. It recalls the properties of the trip, such as the vessel name, the origin and destination addresses, the container identification, the contents (very summarised) and the total mass.
You can use a good marine website to track the ship, or even better, track the container by using its number. It can happen that your container gets a stopover of connecting ship . . . Like ours in Singapore.
And vice-versa
If you ever have to do the entire process the other way, like returning“home”, take into consideration that packing your container will take days; it can pay to secure the doors properly overnight; or pack it at night precisely to assure some presence at that quiet time, or do turns with your family or friends to never leave the container alone at night. Some cities can harbour the dodgiest people who will certainly help you unpack in a couple of hours without you knowing, instead of packing . . . know what I mean?!
I hope this article will help you improve planning and think of the steps you may take to achieve your goal, from the decision making process "is it worth doing all that?", to the "Pfeeew, now sitting on the plane to destination, that’s a good thing done. A beer please!".
For the road, bear in mind the whole process unroll at destination, less securing and optimising, so it should really take less time. However, if you’re moving to one of these very dense cities, I will think of you, while your container is blocking half of that narrow street with all the cars honking as you unpack, in that summer shower, and no one helping!
Preparing for the delivery
I passed on the maybe long and complicated task to find a apartment or a house, with a street or driveway that allows the easy delivery of your container by truck; so not the 1st district of Paris basically . . .If like me you’re moving to a social country like France, with tenants being overprotected and virtually free from being evicted even if they stop paying their rent for years, you’ll find that finding a place demands guarantees you may not have immediately at this stage, such as a permanent job for more than 3 months that pays at least 3 times the amount of the rent. But this is another topic . . .
So that’s it, you’ve secured a place, well you need to organise the oncarriage from the delivery harbour to that place now, and well before the container hits the harbour. In my case, I changed my mind about the target city, and the oncarriage extra cost was in excess of EUR 800, as the harbour was far from the city. You might plan well if you can’t afford this extra cost.
Getting your container Customs cleared
You will first deal with the Customs intermediate (who’s a private company who works at the terminal) who gets hold of the container before clearance by the Customs. You’ll pay them in advance so that they can clear your load quickly when the container gets to the harbour.You may have to send them your container content list, and your certificate of change of residency, to benefit from the GST waiver. This certificate may be obtained from your local Consulate provided you have been living at least 6 months in the country and have been using your equipment for at least 12 months.
If you were registered with them, it may be obtained free of charge. Within a few days they will send it to destination. You must make sure you have this document if the Customs at destination need it.
Remember, all this communication takes time. The port authorities will only allow you to freely park your container for up to four days at the terminal. Past this period of grace, the daily fee will be increasing, and quite deterring.
What you want to do is to get the ball rolling from when your container gets to the port. To achieve this, you’ll want to coordinate the Customs agent and the carrier so that they communicate with each other (each has got to know the contact number of the other.
Final transport from port to your door
After clearance, if clear . . . the Customs intermediate will release your container to the carrier within a few hours of arrival, who will deliver the container to the place of your choice, country or city. Once again, the delivery permit is beyond their considerations. It’s YOUR responsibility. Therefore you should organise a permit with your local Council at least a week prior to due delivery to your place (which can be as early as 2 days after the container ETA at the terminal).In France this permit is free, but you have to organise the "don’t park" roadsigns yourself (they can be rented).. In my case I used the council ones I found in front of my door as they were coincidentally doing some roadworks on that day.
Bear in mind there are always people who don’t respect roadsigns, especially no parking ones. Yours will be no exception. You’ll want to make sure no one is occupying your spot just when the truck will turn up. Keep an eye on your spot, and enforce your rights. I had to.
Getting your container delivered to your door
Actual price example
In our case, this is what the various components actually cost as of 2016, on a France to Australia complete relocation, as well as the contact details of the logistics company we chose.Cleaning, wrapping, packing the container
Free, as we did it ourselves. Call your family and friends!Free may hide a huge cost. If you work for yourself, you’ll find that the time used to pack, which is time you’re not conducting business, can have a massive impact on your income. Include this calculation in the overall equation when you decide to move.
Start to collect cardboard boxes and padding months in advance. Better have more than not enough.
You’ll find malls, furniture shops, University bins and Hospital stock room bins very useful, with a choice of quality padding and cartons. I particularly liked Harvey Norman, with its massive pieces of cardboard and polystyrene, almost intact and whole, that could wrap the couch and bed.
Container delivery, pickup and international freight
EUR 540 for container ground transport in France (subject to distance to the harbour; week-end drop-off/pickup additional fees may apply, e.g. EUR 300 in our case).EUR 2060 for the Sea freight component, from a well-known French port to a big Australian port.
Marine Insurance
About 2% of the cost of replacement at destination. So in a way, you decide how much you pay. You also have the option to not insure your contents at all.
You will have to provide the insurer with your detailed list of items with price valuation for each of them.
Customs Clearance, Harbour fees & inbound trucking at destination
EUR 1390, may vary depending on distance from discharge port to your place.
Total cost for our 20’ container relocation from Australia to France
EUR 4380, may vary if you consider marine insurance or not. Just remember there is just your entire material life in it. The choice remains yours.An advance of 30% is to be paid upon ship booking (about a month before departure)
Contact the logistics company about 6 months ahead of your planned departure date.
Additional comments
The container contents arrived dry and tidy. Nothing had moved. Only a few shelves were scratched, probably because the padding I put between the shelves and the boxes on top was not thick enough.Attention, a“sea smell” was present inside the container. I can’t guarantee that a mattress not within a mattress protector would have made it safely.
Voilà, this topic is coming to an end now. We hope that it gave you an idea of what steps are involved, and what sequence could be observed to carry on the steps needed to achieve this move.